"All I really need is love, but a little chocolate now and then doesn't hurt!"
-- Lucy Van Pelt (Peanuts)

Friday, April 15, 2011

Radish and Tomatillo Salsa


I love when the weather starts getting warmer in the north east! Obviously because, well, the weather is getting warmer, but also because of all the new and exciting produce that is in season, which makes this new found need for a lower sodium, heart conscious diet soooooo much easier to handle.

One of my favorite fresh ingredients is the tomatillo.


Photo Credit: Christian Chefs Fellowship

The small husked tangy relative of the red tomato is delicious raw or roasted, and I love to incorporate them into sauces. Perhaps the most common and simple way to serve these up is in a fresh salsa.
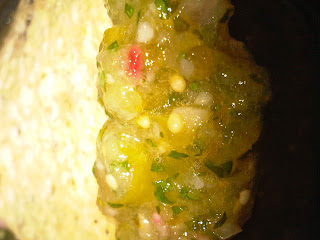
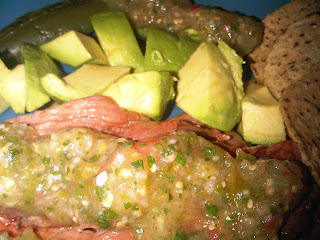
The mild kick in the salsa makes it delicious on chips, over meats such as chicken or beef, or used as a fresh and tasty alternative to hot sauce. The addition of seasonal radishes adds an extra perk of vitamins and nutrients, and cilantro packs in plenty of bright flavor so that the low salt content is easily overlooked! Avocados balance out the salsa well with the creaminess, and make an excellent pair with chips or in a salad with a little of the salsa used as dressing.


Radish and Tomatillo Salsa
1 pound of fresh tomatillos (about 5-6 good sized)
1 jalapeno pepper, sliced in half lengthwise, stem and seeds removed
3 cloves of garlic peeled and crushed
4-5 mid sized radishes, roughly chopped
1/2 cup (two handfuls) chopped fresh cilantro
1 large or two small shallots, chopped
1 dash of sea salt (you only need a TINY bit - really!)

Remove the husk from the tomatillos and wash well under warm water to remove the sticky coating on the skin. Score the bottom of each with a small x and place on a broiler pan (lined with foil for easy cleanup). Add the jalapeno and garlic to the pan and broil under high heat for 8-9 minutes until tomatillos and jalapenos just begin to char (This should take 8-9 minutes, watch the ingredients carefully, you do not want them to burn to a crisp).

Let the charred ingredients cool slightly before handling, and in the mean time chop your other ingredients and add to a blender or food processer. When the tomatillos, jalapenos, and garlic are cool enough to handle, add to the food processer and blend until you have an even consistency. This will not be as thick and chunky as your typical red tomato salsa, but will be packed with flavor and made with much less salt than your typical store bought salsa.

*Note: be sure to wear gloves or wash hands obsessively after working with jalapenos. I have cooked with them a TON of times and still manage to leave enough on my skin that I rub my eyes with painstaking results or start to feel serious irritation under my nail bed hours later. It's no joke, be obsessive, especially if you aren't sure how you will react to them yet.

Serving Suggestion

Tuesday, April 5, 2011

Heart Healthy Spaghetti Squash with Chicken and Radishes

So, I recently found out that I have high blood pressure.. Whooooaaaattttt?!

I did NOT see that coming. Sure, I like to eat, but I always thought my general diet was healthy with a bit of indulgence every so often.. and I try to stay active.. and the logical conclusion at this point seems to be perhaps.. MY JOB! Fabulous. The good news is, I have decided to step out of my position at the conclusion of this school year once my students graduate in order to pursue other opportunities, I'll keep you posted!

In the meantime, I'm trying to incorporate more fresh produce and herbs into my diet and cut out as much salt as possible. I know, terrible, but it can't hurt to eat a little more heart healthy, even at 25. If it gets my blood pressure down and I don't need to start taking high blood medication, I'm all for it. Besides, dark chocolate is still in the picture ;-)

Any suggestions that you may have for watching salt intake or lowering blood pressure in general are totally welcome! You'll probably see some more heart healthy stuff from me. At least... some of the time...

For my first attempt I picked up some spaghetti squash to hinder a craving for some deliciously salty pasta. Scouting out some seasonal produce I settled on some radishes, fresh basil, and brussel sprouts. Then off to grab a lean protein - chicken! Now we have the makings of a fresh tasting, heart healthy, low sodium meal. Mmmmm.

I never roasted, seared, or baked a radish. I have always had them raw and liked them fine. But a light pan sear really gives the radish a ton of mouth watering depth. I sliced the radishes thin, as if they were being served alongside raw fish or on a salad, and then tossed them until translucent on medium heat with a dash of olive oil to coat and a whole crushed clove of garlic.

Spaghetti Squash with Chicken and Radishes


1 medium sized spaghetti squash
3 radishes sliced thin
1 crushed clove of garlic
3-5 chicken tenders sliced diagonally
3-4 tbsp olive oil
5-6 brussel sprouts rinsed and sliced in half
2 tbsp sliced fresh basil

Preheat oven to 400 degrees. Split the spaghetti squash lengthwise using a sturdy chefs knife. Scoop out the pulp and seeds and rub the inside with olive oil. Roast in baking pan until spaghetti strands pull away from the shell easily with fork (about 1 hour usually).

While squash is roasting, turn chicken in pan with about 1 tbsp of olive oil over medium high heat for about two minutes. After two minutes add the radishes, using more oil to coat if necessary, the garlic, and the brussel sprouts cut side down. Cook until chicken is cooked through, radishes are translucent, and brussel sprouts are browned.

When squash is done remove from oven and let sit until cool enough to handle. Remove spaghetti strands and toss with chicken and radish mixture. Sprinkle with fresh basil slices and enjoy.

Saturday, April 2, 2011

Chocolate Covered Strawberry Cupcakes


Happy April!

I'm very excited for this month.. I have a lot of fun things coming up! First of all, spring break is this month, and I am going to MIAMI!!!! I am excited, I have never been. Time for some sun.. sand.. spa.. relaxation.. ah.... it will be great! Now I just need to pack! What to pack.. what to pack... I have a cute new bathing suit to show off.. and a nice floppy beach hat.. but I need to start working on some night time outfits.

A friend of mine has a giveaway on her blog with a super cute clutch that I would love to have down in Miami.. it goes with everything. Check out her giveaway here! http://summer-year-round.blogspot.com/2011/03/giveaway-cory-renee-clutch.html I love a good clutch. They are so classy, it's hard to look bad carrying a cute little clutch.. and they're just right for carrying your night essentials... lipstick.. cell phone.. keys.. and cards..

Also up this month... Easter! Which means Lent is over, and I can start eating sushi again! I thought giving up shopping was hard last year, but only about 3 weeks in I'm dying without sushi!!

Annnnddddd April has a ton of birthdays of people I love.. including MYSELF!! My birthday is next Wednesday.. I'm about to be 25. I'm feeling a little anxious about it, I always thought by this point I would have a lot more accomplished by now, but I would guess most people feel this way. I just feel like my panic is setting in early. I am meeting up with friends for cocktails at one of my favorite restaurants in Philadelphia at the moment, so I'm pretty excited about that!

In the spirit of all these birthdays to celebrate, (including one tonight!) I made some delicious cupcakes to take to a party. Mmmm.


They are a simple chocolate cupcake.. stuffed with some fresh homemade strawberry jam after baking.. and then frosted with some chocolate buttercream frosting. A gooey take on the classic treat, which of course only makes the presentation and tastiness factor climb even higher when served alongside!

Chocolate Covered Strawberry Cupcakes

2 sticks unsalted butter softened
1/2 cup sugar
2 eggs
1 1/2 teaspoons vanilla extract
1/2 cup milk
1 1/2 cups all-purpose flour
1 1/2 tsp baking powder
1 tsp salt

1 cup powdered' sugar
1/2 cup unsweetened cocoa powder (1/4 cup to use in the frosting, 1/4 cup to use in the batter)
fresh strawberry jam (It's easy to make, just chop up a container of strawberries, stir in a few tbsp of sugar, and a splash of water, and cook at medium heat over the range top for about 30 minutes until the jam thickens and coats the back of a spoon. It will thicken even more when cooled)

I chose not to use liners for these cupcakes because I thought they looked prettier with smooth edges. If you do this, you need to butter and flour the muffin cups of your pan. Preheat your oven to 350 degrees F.

Using an electric mixer, blend one stick of butter and sugar together until it is light and fluffy. Then blend in all of the wet ingredients (eggs, vanilla, and milk). Slowly add in the flour whisked with the salt and baking powder at slow speed until combined. Divide the batter into all of the muffin cups. Bake for about 18-20 minutes until set and the center comes out clean. Cool completely.

When cooled, cut a small section out of the top of each cupcake with a small circular fondant cutter, or try your best with a knife if you don't have one.


Lift out section with a knife and fill with jam. Then replace the top pushing down firmly, but gently.


Now for the frosting (this obviously can be done earlier). With an electric mixture, beat the other stick of butter and the confectioners sugar together with a couple of table spoons of milk or water until smooth.


Frost your cupcakes and decorate however you choose.. sprinkles, turbinado sugar, caramelized strawberry slices, with chocolate covered strawberries. Whatever you do, it'll be delicious! Enjoy!

Tuesday, March 29, 2011

Flora and Fauna


So, as much as I like to eat, I sometimes divert my attention to other matters.. such as flowers! Flowers are the first thing I think about when I think "spring," and deserve a place on the table along with any delicious meal.

The Philadelphia Flower Show just closed up recently, and a friend of mine invited me along with some of her friends on the last day. It was truly amazing to see what people can do with plants and flowers. The entire convention center was transformed into "Spring in Paris," and when I say transformed, I mean..


Base of the Eiffel Tower complementing floral tones..


Do you recognize the sculpture? Think about it. Really THINK about it...


Floral light displays inspired by costumes from an American in Paris..


Shadows cast by random objects and projected light (Seriously, the most clever thing I've ever seen. The can can dancer is created by shinning light on cut up CANS!!! I can't even begin to get over it.)

We spent hours wandering around brilliant and elaborate floral displays.. and of course topped it all off with some Gyros at the Redding Terminal Market... Obviously.. right across the way. What a splendid Sunday afternoon.

Just look at these orchids, they look like they have been dusted in cocoa powder. Delish! I absolutely love these (but of course they are a hybrid, and apparently very hard to care for.. so they won't be appearing in my home any time soon, as I would probably kill them - raising plants is not my strength..)


All this flower gazing got me inspired.... so I created a bouquet for my bedside with some simple foliage found at my local Whole Foods.


This bouquet is made from seeded eucalyptus paired with tiny and delicate limonium bunches, both of which you can see up close here. I thought that the shapes and color contrast were very interesting, as well as appealing to the eye. It also gives the impression of a very shy early spring, as we await warmer weather, but know that it is on the way.


I found the arrangement to be aesthetically pleasing at any angle, and the key was calculated asymmetry. I cut the stems of the blooms at various heights ranging within 3 inches, leaving the tallest blooms inside, and the shorter stems on the perimeter; however, I played with the shapes, and did not blend the limonium in with the eucalyptus entirely. This left a disproportionate amount of each bloom on either side of the bouquet, allowing for a different viewing experience depending on the angle. No matter how you blend these sweet blossoms together, I am sure the result will be beautiful! Happy spring, everyone!

Wednesday, March 23, 2011

Caramelized Onion Butternut Squash Soup With Bacon and Chanterelles

Butternut squash usually screams fall... but, I was absolutely craving some butternut squash soup the other day. Sometimes I have some odd cravings, no I know what you're thinking, and that's not it. I've always been this way. But we'll get to my odd craving in just a bit! First we need to talk about this soup!

Butternut squash is a beautiful bright orange color, so it can definitely add some POP to your spring plates in an unexpected way, and it hasn't gone out of season quite yet. Plus, it is full of vitamins, so you can feel good about what you are feeding yourself or your guests (soup is a great party multi-tasker).

For this soup, I wanted to combine some more savory, yet simple, flavors to counter the sweetness of the squash. Some people like to really pump up the sweet factor with cinnamon, maple syrup, and brown sugar, but that's where the fall reputation of this squash comes from. In my soup I played with caramelized onions, chicken stock, bacon, and some deliciously nutty yet mild chanterelle mushrooms. Now, you don't HAVE to use chanterelles, use whatever you'd like, but I love these babies if you're lucky enough to get your hands on them. I found dried ones in the grocery store and just had to check them out. I reconstituted them in the chicken stock so that the broth would get the flavor and they would plump up, and they were almost as good as the fresh stuff! And a lot less expensive!

The soup turned out creamy, smooth, slightly sweet, and robust all at once. Enjoy with whatever you'd like. I don't necessarily suggest only one side, this flavor profile would serve well with poultry, but also stands up to red meat. A hearty salad of green leafy lettuce, like a good quality boston butter, avocado, tomato, and mozzarella cheese would make a great lunch addition. As would a crostini with prosciutto some red onion and maybe even some more roasted squash pieces?! Why NOT? I'm loving squash today...

As for me... it's been a long.. interesting day.. so I chose to go with some serious comfort food. Like I said, I have some odd cravings.. and when I want something, I WANT IT!

Which brings me to.....


caramelized onion butternut squash soup served with tater tots smothered in melted fontina cheese, ketchup, and a SMALL (key word small) salad.


I need to be better about eating salads. Sometimes I really just put a few leaves of lettuce on my plate to make myself feel good. It's sad. Hold me to that, I will get better at eating salads!

Whatever you serve with your soup, enjoy it!!


Caramelized Onion Butternut Squash Soup With Crispy Bacon and Chanterelle Mushrooms

1 ounce dried chanterelle mushrooms
1 32ounce box of chicken stock (low sodium if you can)
1 small yellow onion, chopped
1 average sized butternut squash (sliced in half lengthwise and seeds removed)
3-4 slices of bacon

Lightly oil the cut side of your squash and roast face up in the oven at 400 degrees until soft and fork tender (about an hour)

Meanwhile reconstitute the mushrooms in chicken stock by bringing stock to a boil, turning off the heat, and then adding the mushrooms. Let sit in hot stock for 45 minutes or so (until the squash has roasted).

While waiting for the squash to become cool enough to handle, toss the onions in a skillet with a tbsp of olive oil. On medium-high heat, saute the onions, stirring occasionally, until they brown and begin to caramelize lightly. Turn off the heat and set aside.

Take your squash out of it's now soft shell, and place in a food processer (or blender). Strain the mushrooms from the chicken stock and add the stock to the processor. Place the onions and half of the mushrooms into the processor as well and blend until pureed. You should have a thick soup. Slice bacon into small squarish pieces and saute in the pan used for the onions until crisped. Chop remaning chanterelles and mix them in with the crisped bacon.

Serve your soup in bowls and top with the mushroom/bacon mixture. Eat up!

Wednesday, March 16, 2011

Bread Letter


Photo Credit: Jaden Hair, Steamy Kitchen

Uhg. Sometimes the best thing to do when you are frustrated is to create something positive. So here it goes..

Today - my students were on the second day of the Pennsylvania System of School Standardized Assessment (a high stakes, state standardized exam that we spend all year getting ready for... and take in March or April). While I am not at liberty to discuss the specific content of the exam, one of the essay questions was quite challenging in ways that I thought were classist against my students (I work in a high poverty urban school). I'm being purposefully vague, so as to not disclose any of the content of the test, but for reals. So yeah. I'm annoyed. The topic, however, was making bread.

Last year, my 7th graders (now most of which are my 8th graders) and I made bread as a two day science and math lab. It was the most fun I think we've had in a classroom. Well not the most. Science survivor was pretty fun too. But that's another story.. Not only had none of them had previous experience making bread, but I got to watch them work cohesively as a unit to make loaves of delicious bread (which they later ate with a plethora of toppings. WHO DOESN'T LOVE NUTELLA ON FRESH BREAD?).

While we didn't get too fancy as far as equipement goes (we used very clean hands), I was glad to see many of my students incorporating their previous experience into their responses. Experiential knowledge cannot be replaced by text books. I think every middle schooler in America has some favorite bread memory (or two).

The recipe I used with my students (and use at home often) is super easy. It's taken from Jaden Hair's blog "Steamy Kitchen." I've made it many times and it always comes out great! I'm ready to start mixing it up, I think it would be a good base for a Kalamata Olive loaf, or perhaps a rosemary and olive oil loaf with roasted garlic. I'll let you know how it turns out. I'm being a little boring, huh? Well, what about a sun dried tomato and red pepper flake loaf, maybe with some cayenne for spice? What do you think? Anyone have any crazy, fun, delicious, interesting, or new bread flavors I should try, or that you haven't tried yet and want me to test out for you? I do love bread.

I have included the recipe below for your convenience, but I encourage you to visit her blog as well in order to see her son at age 4 show the procedure step by step. Yes, it really is that easy.

http://steamykitchen.com/168-no-knead-bread-revisited.html


no knead bread recipe

Servings: One 1-pound loaf Prep Time: Cook Time:
No Knead Bread Recipe is adapted from Mark Bittman of NY Times who got it from Sullivan Street Bakery. When the recipe first came out, it was the blogging community who took the bread to new heights, especially Rose Levy Beranbaum, author of The Bread Bible. I followed Rose's experiments through the weeks and learned from her recipe adjustments and the why's of how this bread works.

ingredients:
3 cups bread flour (I like Harvest King bread flour)
1/4 teaspoon instant yeast
1 teaspoon fine table salt (or 3/4 tablespoon of kosher salt)
1 1/2 cups warm water

Covered pot (five-quart or larger cast iron, Pyrex, ceramic, enamel...something that can go into a 450F oven.)

Directions:
1. Mix dough: The night before, combine all ingredients in a big bowl with a wooden spoon until the dough just comes together. It will be a shaggy, doughy mess. Cover with plastic wrap and let sit 12-20 hours on countertop.

2. Shape & preheat: The dough will now be wet, sticky and bubbly. With a wet spatula, dump the dough on a floured surface. Fold ends of dough over a few times with the spatula and nudge it into a ball shape. You can use your hands if you like, just keep your hands wet so that the dough does not stick. Generously dust a cotton towel (not terrycloth) with flour. Set dough seam side down on top of towel. Fold towel over the dough. Let it nap for 2 hours. When you've got about a half hour left, slip your covered pot into the oven and preheat to 450F.

3. Bake: Your dough should have doubled in size. Remove pot from oven. Holding towel, turn over and dump wobbly dough into pot, using your hands to get the dough off the towel. Doesn't matter which way it lands. Shake to even dough out. Cover. Bake 30 minutes. Uncover, bake another 15-20 minutes or until the crust is beautifully golden and middle of loaf is 210F. Remove and let cool on wired rack. If not eating right away, you can re-crisp crust in 350F oven for 10 minutes. Best way to eat it? Smear a warm slice with some good butter (Kerrygold and Lurpac are both found in your grocery stores, usually on top shelf)

Hope you enjoy Jaden's recipe and how to's and send me some GREAT bread ideas!

Saturday, March 12, 2011

ALS Association Hot Chocolate 2011 - The Chocolate and The Sharks


It takes a lot to get me out last minute on a Thursday night during the school year. Especially in the pouring rain. Especially when out means, across the Ben Franklin Bridge, and into Camden, NJ. However, last Thursday I had an extremely good reason!


Any event that is described to me as a "chocolate frenzy," sets the bar of expectation REALLY REALLY REALLY high. I mean REALLY. The Philadelphia ALS Associations' Hot Chocolate, which took place at the Camden Adventure Aquarium Ballroom this year on March 10, 2011, was every chocolate addicts' dream. I mean, I'm already blocking out my calendar for next year's event.

Invited by a coworker after school (who happens to be the sister of one of the co-chairs of the event), I raced home to change and brave myself to go back into the monsoon of a rain storm that had been going on all day. It had been a long week.. and she promised that there would be chocolate and drinks EVERYWHERE. She did not lie.

When I walked in with my admission ticket, I was invited by the soothing background of the Adventure Aquarium's giant shark and sea life tanks. The Aquarium's tanks are beautiful by day, but transform into the "Currents Ballroom" providing a breathtaking backdrop at an evening event. As soon as I dropped my gaze from the sharks to find my friend Julie, I was entranced by the rivers of chocolate fountains and well paired dipping foods (pinnacles of pineapple, streams of strawberries, mountain's of marshmallows, plains of pretzels, caverns of cookies, caves of cakes.. I could go on..)


Julie found me and pulled me out of my stupor, immediately escorting me to the chocolate martini bar. Delicious. Chocolate syrup squirted in the glass, topped with chocolate infused vodka, creme de cacao, and chocolate liqueur. Oh. Em. Gee. Why yes, I'll have one, thank you very much. And some moscato to pair with my chocolate tasting? Oh yes. Of course.

After introducing me to a handful of people, she led me through the back ballroom to explore chocolate sculptures, bar tables of chocolate treats, sandwiches for sustenance (amateurs), a wine bar, what seemed to be upwards of 25 handcrafted chocolate vendors (some from states away!), massage chairs, tables of donated gummi, chocolate, and largely manufactured items (larger companies like Tasty Cake, Zitner's, and Just Born - makers of Peanut Chews - sent never ending cases of their product for distribution), and silent auctions. I have never been around SO much delicious, quality, aesthetically pleasing chocolate at one time. It made Hershey Park look like Six Flags Mediocre Adventure. That's right. A NON-chocolate themed amusement park that just is not as cool Six Flags Great Adventure. It was a ballroom full of relaxation, with side rooms of MORE relaxation. It was a giant candy store for adults. Willie Wonka, what up. I have seen your glory. And I loved it.


Wine! Friends!


Chocolate vendors just giving away stuff in pretty little packages! (This one in particular had AMAZING chocolate peanut butter brownies... that I most certainly took home several of...)


A steel drum band playing in front of a giant cartoon shark! I mean who could NOT love that? Who? No one.


I could literally feel my blood pressure drop while watching these guys and indulging in delicious chocolate tastings.


Beautiful chocolate sculpture egg.


Really neat sea life.

So, the entire thing was amazing, and seemed to be a huge success for the charity. I would wager that they raised a ton of money for ALS, so once I was done being so excited by all the chocolate and general awesomeness of the event, I felt good that my admission ticket (as well as all the silent auction items people bid on, and raffle tickets that were bought) went to a good cause. The speakers were fabulous and reminded us what the event was truly about (helping those with ALS - more commonly known ask Lou Gehrig's Disease), and the co-chairs graciously ensured that everyone had a great experience.


Check them out. Larry and Jill Kaplan have been pulling this event off for several years, while working full time and raising a family. Role models!

On the way out, everyone gets to take home a cute martini glass from the event, stuffed with a very necessary toothbrush. So adorable. But that's not all...


Julie and I made off with this giant tray of fudge to bring into work the next day. We had so many friends on Friday.


Anddddd this is my bag of loot stuffed with delicious confections from the amazing chocolate vendors at the event. Chocolate covered pretzels I snagged for the boyfriend, peanut butter brownies for.. um.. myself.. obviously, gummi candies and tasty cakes, for my students, and all sorts of delicious treats!

What a wonderful Thursday night. What a wonderful night, period. The only question left is... who is coming with me next year?!